What is DiskDigger Pro file recovery Apps?
DiskDigger Pro is a versatile file recovery application designed to recover lost photos, videos, documents, and other file types from a variety of storage media. It operates by scanning storage sectors to locate file fragments and reconstruct files that have been deleted or corrupted. The tool supports recovery from internal device storage, external USB drives, SD cards, and formatted partitions, providing multiple scanning modes that range from quick scans to deep byte-level analysis. Users can select file types to focus the scan on images, videos, or generic file extensions, reducing scan time and improving the relevance of recovered items. The interface presents recoverable files in a sortable list with preview thumbnails for many common formats, enabling users to inspect items before committing to recovery. Recovered files can be restored to a chosen directory, written to external media, or exported in bulk for further processing. DiskDigger Pro also includes options to carve files from unallocated space using file signatures, which is useful when filesystem metadata has been overwritten. The utility offers adjustable scanning parameters, such as block size and memory usage, allowing it to adapt to devices with constrained resources. For power users, the tool provides detailed logs and technical information about detected file headers and clusters, facilitating manual verification and forensic workflows. While the application focuses on practical recovery rather than full-scale digital forensics, it provides enough technical depth for informed users to understand how their data is being reconstructed, and it blends ease of use with configurable behavior suitable for a range of recovery scenarios. It is compatible with a range of file systems and supports raw devices, which increases its applicability across platforms and storage technologies. Regular updates to scanning signatures expand its capabilities over time, making it a practical choice for diverse recovery needs, and varied environments.
Features of DiskDigger Pro cover a wide spectrum of recovery tasks, combining targeted scanning, flexible output options, and advanced file carving. The program offers quick scan routines that analyze filesystem tables to locate recently deleted entries, as well as deep scans that examine raw disk blocks for recognizable file signatures. Users can pick specific file categories like JPEG, PNG, MP4, DOCX, PDF, and common compressed archives to accelerate searches and narrow results. During scanning, found files are presented with metadata such as filename fragments, estimated size, deletion date when available, and a preview thumbnail for visual formats. Export choices include restoring files to a designated folder, creating compressed archives of recovered items, or saving metadata reports that summarize the recovery session. For more technical operations, DiskDigger Pro supports reading raw device images and can operate on unmounted partitions, which helps when conventional access is blocked by filesystem errors. The product includes parameters that let users manage memory consumption and control how deep the signature-based carving should go, balancing thoroughness with performance. Progress indicators and estimated remaining time give visibility during lengthy scans, and a detailed session log records discovered clusters and signature matches for later reference. Additionally, the tool can filter and deduplicate results to reduce redundant recoveries, and it recognizes fragmented files to varying degrees depending on how the filesystem recorded fragments. Advanced filters allow sorting by size, date range, and file type, which simplifies locating specific items among thousands of candidates. Overall, the feature set is designed to accommodate casual users recovering a few photos as well as more experienced users tackling complex restorations across multiple storage devices. It emphasizes a balance of automated helpers and manual controls so that results can be fine tuned and recovery outcomes are transparent to people with different levels of experience. Regularly.
At a technical level, DiskDigger Pro combines filesystem-aware techniques with signature-based carving to maximize recovery chances across different failure scenarios. Filesystem-aware scans inspect allocation tables, directory entries, and journal records to find references to deleted files that still have intact metadata. This method can restore filenames, timestamps, and contiguous data when the filesystem has not been severely altered. When metadata is missing or corrupted, signature-based carving steps in by scanning raw sectors for recognizable file headers and footers, rebuilding files by matching byte patterns associated with common formats. That approach is particularly useful for recovering images and multimedia content but is less reliable for highly fragmented files or formats without strong, consistent signatures. The software supports numerous filesystem types and raw device access, allowing direct reads from FAT, exFAT, NTFS, ext family filesystems, and card-formatted partitions, among others. DiskDigger Pro can generate hashes for recovered items to assist in integrity checks and to help identify duplicates. Processing performance depends on device throughput, block size choices, and available system memory; the tool provides controls to throttle scanning intensity and to limit resource consumption for smoother operation on constrained systems. Recovery success also hinges on how quickly the scan is performed after data loss, since subsequent writes can overwrite reclaimed sectors. The application logs detected header offsets, carved extents, and cluster mappings to facilitate deeper analysis or verification using external utilities. While not positioned as a formal forensic suite, its transparency of findings and support for raw imaging make it useful for careful recovery workflows where understanding the provenance and completeness of recovered files is important. The product also permits selective saving of file lists and session snapshots so users can pause extended operations and resume later without repeating expensive scans, which is especially helpful when working with large multi-gigabyte volumes. Periodically.
Typical usage scenarios for DiskDigger Pro span casual personal recoveries to time-sensitive professional needs. Photographers often use the tool to restore accidentally deleted photos or partially overwritten images from memory cards after a busy shoot, taking advantage of preview thumbnails to quickly sort recoverable frames. Home users can retrieve family videos and documents that were mistakenly deleted or lost after a quick format, while students may recover project files or presentations lost due to accidental removals. Small businesses that keep local backups on external drives can deploy the tool to salvage critical spreadsheets or invoices after drive errors or unintended deletions. The application is also useful for retrieving media from older devices whose filesystems are no longer fully supported by modern systems, since raw recovery methods can extract content without relying on intact metadata. Scenarios involving partially corrupted partitions, interrupted file transfers, or failed firmware updates can sometimes be remedied by performing a deep scan and selectively restoring intact portions of files. For workflow integration, recovered files can be exported for quality checks, post-processing, or reingestion into production systems. When dealing with camera cards or USB sticks, it is common practice to write recovered items to a different storage target to avoid overwriting remaining data on the affected device. People working with large file sets benefit from the tool's filtering, sorting, and deduplication features to streamline identification of the most important items for recovery. Whether addressing a few critical files or a bulk restoration, DiskDigger Pro aims to provide practical tools that adapt to varied device types and loss circumstances while offering transparency about which methods found each recovered item. Users commonly combine recovered exports with image editors, data validation utilities, or batch renaming scripts to complete workflows. The approach reduces downtime and recovers value from otherwise inaccessible media quickly.
No recovery tool can guarantee complete restoration in every circumstance, and DiskDigger Pro has practical limits that are important to understand before attempting a recovery session. The most significant constraint is data overwriting: once storage sectors containing deleted content are reused by new writes, reconstruction of the original data becomes increasingly unlikely or impossible. Highly fragmented files pose another challenge because carving techniques often assume contiguous blocks; fragmented multimedia or complex document formats may not be reassembled correctly without intact filesystem mapping. Encrypted volumes present an additional obstacle: if encryption metadata or keys are unavailable, raw carving will produce unreadable output. Performance limitations also emerge on very large storage volumes or on devices with slow I/O, where deep scans can take many hours and require careful resource planning. To maximize recovery prospects, it is advisable to stop using the affected device immediately, mount it as read-only when possible, and perform scans that target specific file types to reduce processing time. Writing recovered items to a separate destination preserves remaining data on the original medium and avoids accidental overwrites. When working with critical or sensitive data, exporting session logs and hash lists helps maintain a record of what was recovered and supports later verification. DiskDigger Pro’s paid edition unlocks advanced scanning modes and bulk export capabilities that are geared toward intensive recovery tasks, while offering automation and configuration options useful for experienced users. Evaluating recovery outcomes realistically and combining recovered results with validation steps such as file opening, checksums, and metadata inspection yields the best chance of restoring usable files from damaged or formatted storage. For large scale operations, scripting and batch approaches can be combined with exported file lists to automate repetitive restore tasks, and pairing recovered files with validation workflows reduces the risk of accepting corrupted or incomplete items.
How to Get Started with DiskDigger Pro file recovery?
- 1. Download and Install
- - Visit the DiskDigger website or your app store.
- - Download DiskDigger Pro.
- - Install the application on your device.
- 2. Launch the Application
- - Open DiskDigger Pro after installation.
- 3. Choose Recovery Type
- - Select either “Full Scan” or “Quick Scan” based on your needs.
- - Full Scan requires root access for deeper recovery.
- 4. Select Storage
- - Choose the storage drive or partition to scan.
- - Confirm permissions if prompted.
- 5. Start Scanning
- - Initiate the scanning process.
- - Wait for the scan to complete; this may take some time.
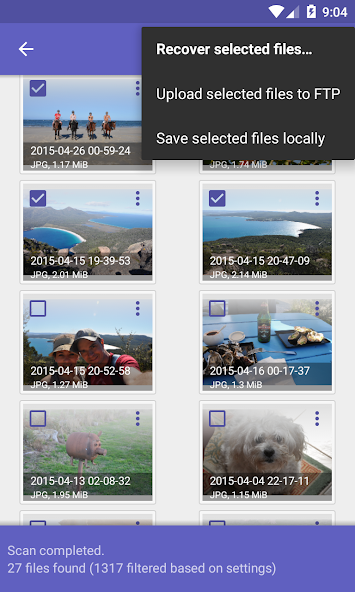
- 6. Review Found Files
- - Browse through recovered files.
- - Select files you wish to recover.
- 7. Recover Files
- - Choose a location to save recovered files.
- - Confirm the recovery operation.
- 8. Check Recovered Files
- - Ensure recovered files are accessible in the chosen location.
- 9. Use Additional Features
- - Explore other features, like filtering file types or deep scanning settings.
- - Utilize options for saving scan results for future reference.
10 Pro Tips for DiskDigger Pro file recovery Users
- 1. **Use Deep Scan**: Opt for the Deep Scan feature to maximize recovery chances, especially for formatted or corrupted drives.
- 2. **Select the Right Storage Device**: Ensure you select the correct device or partition from which you want to recover files to avoid confusion.
- 3. **Pause and Resume Scans**: If needed, pause the scan to check interim results, and then resume the scan to find more files.
- 4. **Filter Results**: Utilize the filtering options to narrow down results by file type or date, making it easier to locate specific files.
- 5. **Save Scan Progress**: Save the scan results for later retrieval to avoid rescanning if you have to pause or stop the process.
- 6. **Choose File Types**: Specify the types of files you want to recover, which can significantly speed up the scanning process.
- 7. **Backup Before Recovery**: Always create a backup of recoverable files to a different drive to prevent potential data loss during the recovery process.
- 8. **Keep Software Updated**: Regularly update DiskDigger Pro to ensure you have the latest features and improvements for optimal performance.
- 9. **Use a Stable Power Source**: Conduct recovery sessions while ensuring a stable power supply to prevent interruptions during the process.
- 10. **Understand File Structures**: Familiarize yourself with common file structures to better interpret results and differentiate between similar file types.
The Best Hidden Features in DiskDigger Pro file recovery
- Deep Scan: Allows in-depth scanning of storage devices, recovering files that other methods might miss.
- Preview Feature: Offers a preview of recoverable files before restoration, enabling users to select the desired items.
- Custom File Type Support: Users can define specific file types to scan for, optimizing the recovery process.
- Option for Root and Non-Root: Works on both rooted and non-rooted devices, making it versatile for different user access levels.
- Storage Location Options: Can scan various storage locations, including internal memory, SD cards, and USB devices.
- Recovery to Custom Locations: Enables users to save recovered files to chosen directories, not just the original location.
- File Filtering: Filters results by file size, date, and type, making it easier to find specific files.
- Batch Recovery: Allows multiple files to be recovered at once, streamlining the process.
- Resume Scanning: Lets users pause and resume scans, preventing loss of progress.
- Logging Options: Provides detailed logs of recovery operations, improving transparency and user understanding.
DiskDigger Pro file recovery Faqs
What types of files can DiskDigger Pro recover?
DiskDigger Pro can recover various types of files including images, videos, and audio files. It supports common formats like JPEG, PNG, MP4, and MP3, making it useful for retrieving lost media files.
How does DiskDigger Pro perform file recovery?
The app scans your device's storage for deleted files using sophisticated algorithms. It performs a quick scan first, then gives an option to run a deeper scan for more thorough recovery of lost files.
Can I recover files from an unrooted device?
Yes, DiskDigger Pro can recover files from an unrooted device, but the recovery options will be limited. Root access allows for more advanced recovery capabilities and a higher chance of retrieving files.
What steps should I follow to conduct a deeper scan?
To conduct a deeper scan using DiskDigger Pro, follow these steps: 1. Open DiskDigger Pro. 2. Select the type of scan: 'Full Memory Scan' for deeper capabilities. 3. Grant root access if prompted. 4. Choose the storage partition to scan and start the process.
How can I view and restore the files found by DiskDigger Pro?
After scanning, DiskDigger will present a list of recoverable files. To restore, simply select the files you want to recover, then choose the location to save them. You can also preview files before restoration.