What is Floor Plan Creator Apps?
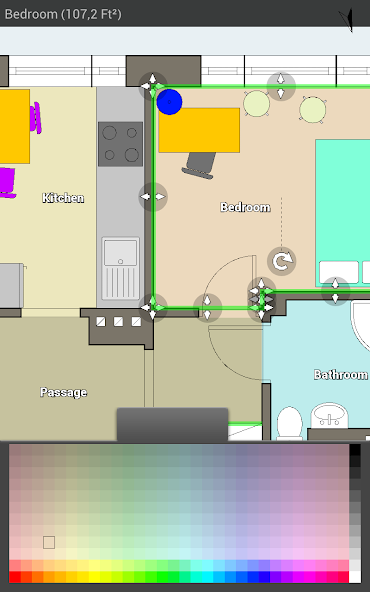
Floor Plan Creator art-design is a specialized software solution focused on helping users produce accurate, scalable architectural floor plans and visually appealing interior layouts. It combines precision measurement tools with an intuitive drawing environment so that both professional designers and enthusiastic homeowners can translate ideas into measurable blueprints. The product supports multi-level building plans, enabling users to construct single floors, stacked stories, and complex multi-floor projects with consistent alignment and dimensioning across each level. A core strength lies in the balance between technical rigor and visual presentation; users can define walls, doors, and windows with exact dimensions while simultaneously arranging furniture, finishes, and decorative elements for realistic mockups. The platform also emphasizes ease of iteration, with editable elements and reusable symbols that accelerate repetitive tasks and maintain consistency across rooms and projects. Automatic features such as grid snapping, intelligent measurement feedback, and constraint-based adjustments reduce manual corrections and ensure spatial relationships remain coherent when parts of the plan change. Beyond geometry, the application integrates annotation and labeling capabilities so that technical notes, material specifications, and room names can coexist on drawings intended for both construction and client review. The interface is designed to accommodate varying levels of expertise, offering guided defaults for newcomers and granular controls for experienced drafters. Together, these characteristics make Floor Plan Creator art-design useful for concept generation, detailed documentation, permit-ready submissions, and presentation-focused visuals. It positions itself as a bridge between initial sketches and final schematic deliverables, enabling better communication among stakeholders and clearer visualization of built outcomes. Designers appreciate the modular approach to components, the export options for layered files, and the ability to annotate revisions for project history, making the tool adaptable to studio pipelines and freelance workflows while preserving drawing integrity and simplifying handoff to contractors, fabricators, and allied consultants during coordination phases.
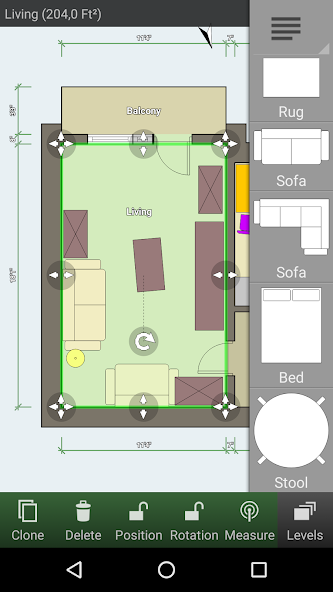
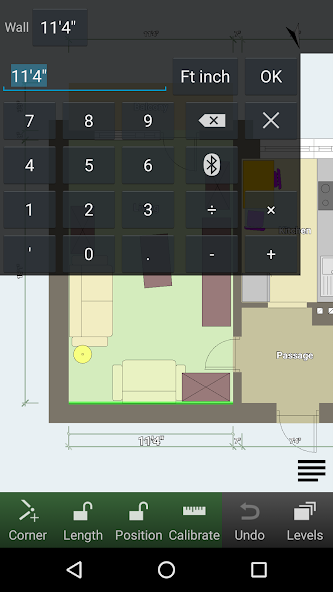
Workflow in Floor Plan Creator art-design emphasizes speed and clarity by providing a sequence of tools matched to typical design stages: initial layout, spatial definition, outfitting, documentation, and presentation. Users begin with simple axis and boundary drawing, snapping walls to grid increments while toggling measurement units and scale to match project standards. Layering and grouping facilities let elements be organized into structural, mechanical, and furnishing classes, enabling selective visibility and print-ready layers for different audiences. Reusable object libraries and template rooms accelerate repetitive setups and support consistent tagging for materials and finishes, which simplifies global edits and batch updates. For precision, dimension chains and reference lines establish measured relationships so that moving a wall cascades predictable adjustments to adjoining features and connected fixtures. The interface supports both mouse and touch gestures, with contextual toolbars that expose property panels for custom sizing, rotation, and constraint locking. Interactive rulers and live readouts provide continuous numeric feedback as shapes are drawn or resized, reducing guesswork and rework. The product also facilitates iterative review cycles by offering markup options such as revision clouds, colored annotations, and timestamped notes that can be exported alongside drawings for record-keeping. In more advanced workflows, users can duplicate floors and synchronize alterations across multiple levels to maintain vertical alignment of shafts, stairs, and utility runs. Version history features allow restoration of prior states and comparison between revisions, supporting design exploration without losing earlier concepts. Because the workflow is modular, teams can adopt parts of the toolset that fit their process: quick conceptual massing for client meetings, mid-stage coordination for consultant review, or detailed plan sets for construction documentation, all within a unified application environment. Custom export presets and automated layer legends further streamline delivery requirements, saving time during transmittal and enabling consistent presentation of variant options to stakeholders globally.
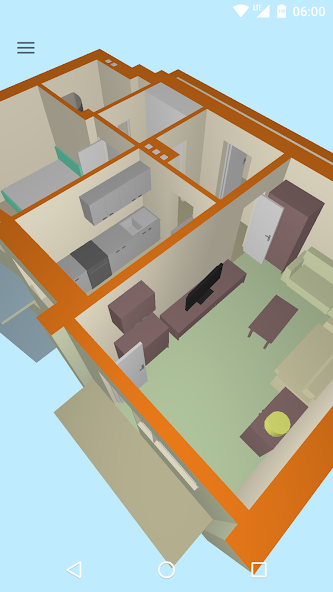
Art-design features within Floor Plan Creator focus on translating architectural intent into compelling visual narratives that extend beyond technical plans. Material and finish libraries allow designers to apply textures to floors, walls, and ceilings, specifying pattern scale, reflectivity, and color to preview how different surface treatments will read in plan and perspective. Furnishing catalogs include modular pieces with parametrically adjustable dimensions so that seating banks, storage units, and bespoke cabinetry can be tailored to fit measured openings. Lighting simulation tools approximate the effect of fixtures in enclosed spaces, helping to evaluate circulation, illumination levels, and mood across design scenarios. The software supports layered rendering modes ranging from simple linework and hatch patterns for schematic presentations to photorealistic shading that leverages surface properties and light placement to create persuasive client imagery. For 3D investigation, plans can be extruded into volumetric models, enabling sectional cuts, elevated views, and walkthrough animations that communicate circulation and spatial relationships more clearly than flat drawings. Annotation and graphic controls let designers create aesthetic presentation sheets: control over line weights, hatch scales, annotation fonts, and titleblock insertion produces consistent, branded deliverables. Object snapping and alignment guides help compose scenes with balanced symmetry and rhythm, while grouping tools enable designers to move curated vignettes of furniture and accessories as single units. The platform encourages experimentation through nondestructive edits and duplicated scenario branches so alternative palettes, layouts, and furniture mixes can be compared side by side. Exportable visual assets - high-resolution raster outputs and layered vector files - support further refinement in image-editing or desktop publishing tools, facilitating final touches and composite presentations. These art-design capabilities bridge the technical demands of accurate plans with the evocative power of design visualization, supporting both functional decision-making and persuasive storytelling. Visual studies help align client expectations, test material combinations, and refine project narratives across multiple iterations.
Technical interoperability is a significant aspect of Floor Plan Creator art-design, enabling created drawings to participate in broader digital workflows. The application supports common exchange formats so that plans and object libraries can be exported as DWG and DXF for compatibility with traditional CAD packages, as SVG and PDF for vector-based presentation and print workflows, and as raster images for web previews and rapid mockups. For three-dimensional needs, the software can generate OBJ or Collada-style files that are usable in rendering engines and virtual reality tools, as well as layered exports that preserve material assignments and object hierarchies for downstream manipulation. Measurement metadata is preserved in many export routes, keeping dimension strings and layer names intact so that receiving stakeholders can trust the quantitative information embedded within delivered files. Scaling and layout controls let users prepare sheet sets with consistent titleblocks, scale bars, and printing templates tailored to required paper sizes and resolution settings. Batch export features accelerate production when multiple views, levels, or design variants must be output together, and naming conventions can be automated to reflect version numbers or date stamps. Interoperability also extends to importing legacy plans and vector assets: raster-to-vector tracing utilities and intelligent snap-to-geometry routines help convert scanned drawings into editable vector constructs, reducing the time required to digitize existing documentation. The platform accommodates unit conversions and coordinate references to align with regional standards and tie into surveying or GIS datasets when needed. For teams that integrate the product into a larger toolchain, lightweight XML or JSON descriptors can accompany exports, providing machine-readable metadata for automated pipelines and content management systems. Overall, the export and import toolset strives to minimize friction during handoff, ensuring drawings remain actionable as they move between designers, engineers, fabricators, and other specialists. This interoperability supports efficient cross-discipline coordination and reuse.
Practical use cases for Floor Plan Creator art-design span a wide spectrum, from individual homeowners sketching renovation ideas to multidisciplinary design firms preparing coordinated construction documents. For homeowners, the application simplifies spatial planning by letting users test furniture layouts, calculate area and circulation, and visualize finish alternatives before committing to purchases or contractors. Interior designers leverage the tool to iterate schemes rapidly, produce client-facing visuals, and export measurements required for custom millwork or built-in solutions. Architects use it for conceptual studies, quick massing, and preliminary programming where quantified room sizes and adjacency relationships influence early mass models; the ability to synchronize changes across floors supports consistent vertical systems such as stair cores and mechanical shafts. Contractors and fabricators benefit from precise dimensioning, component lists, and annotated drawings that reduce ambiguity during procurement and on-site assembly. Landscape designers and small commercial planners can utilize mixed-use object libraries and site boundary tools to position structures, walkways, and exterior furnishings while maintaining scale accuracy. Educational programs and workshops find value in the approachable interface for teaching spatial reasoning, drafting fundamentals, and the relationship between plans and three-dimensional spaces. Additionally, the software aids marketing and real estate activities by producing clear plan graphics and renderable views that help potential buyers understand unit layouts and circulation patterns. Beyond specific job roles, the product encourages better decision-making by shortening feedback loops and enabling side-by-side comparisons of design alternatives; users can quantify trade-offs in area, cost, or furniture fit quickly. Customization options let teams embed their standards and visual identity into outputs, supporting brand consistency across deliverables. Altogether, these use cases demonstrate the software's capacity to streamline design processes, reduce errors, and improve communication among all parties involved in realizing built environments.