What is GPS Map Camera Apps?
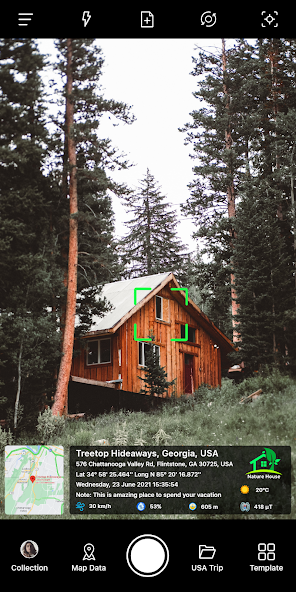
GPS Map Camera photography integrates location awareness into conventional image capture by embedding geospatial data directly onto or into photographs. Instead of relying only on separate metadata, this approach produces images that include visible coordinates, timestamps, place names, altitude, compass bearings, and sometimes custom labels or project identifiers. The visible overlay makes it simple to communicate where and when a photo was taken without opening specialized software, which is particularly useful for rapid reporting, inspection, and record keeping. In practice such images preserve EXIF geotags as usual while optionally burning a human readable caption into the picture pixels. That caption can be styled and positioned to minimize obstruction of important visual content while remaining legible for later review or printing. GPS Map Camera photography is not limited to a single device type; it can be implemented on smartphones, tablets, and dedicated cameras that support location logging. Accuracy depends on the hardware and environmental conditions, so urban canyons or dense foliage may produce less precise coordinates. Many implementations allow selection of coordinate formats such as decimal degrees or degrees minutes seconds, and they may present address resolution when network connectivity is available. Beyond coordinates, overlays can include case numbers, project codes, measurement values, or operator names to fit a particular workflow. The result is a self documenting photo that reduces disputes about timing and position, streamlines audits, and simplifies archiving. For field teams and solo practitioners alike, GPS Map Camera photography acts as a portable geotagging assistant, converting raw images into immediately useful evidence or context rich visual records without the need to manually annotate each picture. Adoption is common in sectors that require verifiable visual records, and organizations design naming conventions for overlays to maintain consistency across teams. This approach reduces error, accelerates workflows, and creates auditable photo trails globally.
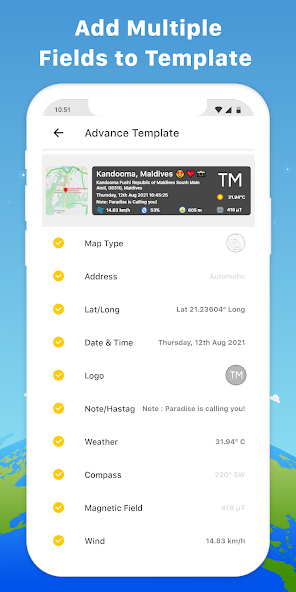
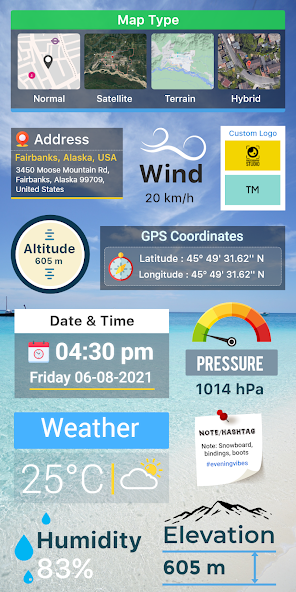
At the technical core GPS Map Camera photography combines image files with geospatial metadata and optional visible overlays to produce multi layered documentation. Modern implementations typically write standard EXIF tags including GPSLatitude, GPSLongitude, GPSAltitude, and timestamp fields so that images remain compatible with mapping tools and GIS software. In addition many solutions generate a flattened overlay or watermark that encodes the same information as legible text or graphic elements baked into the photo pixels. That dual approach preserves machine readable positioning while giving people immediate context. Advanced features may include selectable coordinate formats such as decimal degrees, degrees minutes seconds, or UTM, selectable datum references, and configurable time zone handling. Some systems let users toggle display elements like compass heading, speed, address resolution, and custom textual fields such as job identifiers or inspector names. Accuracy depends on satellite reception and device sensors; devices can report horizontal dilution of precision or estimated error and some apps allow capture only when accuracy thresholds are met. When network connectivity is present reverse geocoding can provide human readable addresses and place names to accompany raw coordinates, but systems also allow offline capture with later synchronization so workflow is not blocked by lack of coverage. File management often includes automatic naming conventions incorporating date and coordinates, and options to export batch metadata as CSV, KML or GeoJSON for integration with reporting systems. Image quality settings remain independent so professional grade visuals are possible while preserving embedded location data. For organizations needing chain of custody some implementations add hash based checksums or digital signatures to verify that photos have not been altered after capture, strengthening the evidentiary value of the photographs for audits, claims, or legal proceedings. Workflow designers often combine geotagged images with maps and notes to build searchable, auditable project archives and reports efficiently.
GPS Map Camera photography finds wide adoption across industries where verifiable visual evidence matters for compliance, claims, inspections, and maintenance. In construction and civil engineering teams use geotagged photos to document site progress, mark locations of defects, and associate images with drawings or permit numbers for later reference. Insurance adjusters rely on location stamped images to substantiate claims quickly, capturing damage context and position to support estimates and settlements. Environmental and natural resource surveys use GPS embedded imagery to map species observations, erosion points, or pollution incidents with precise coordinates tied to each observation. Utilities and telecom companies deploy geolocated photography to inventory assets such as poles, cabinets, and junction boxes, creating a visual index that simplifies audits and replacement planning. For public safety and emergency response, timestamped geotagged photos assist incident commanders by providing situational awareness from field teams and by preserving chronological evidence for after action reviews. Real estate agents and property managers enhance listings and condition reports with location aware images that pair visual condition with precise placement. Surveyors and geotechnical engineers integrate geotagged photographs into GIS layers and georeferenced reports, aligning photographic records with survey points and cross sections. Agricultural professionals can monitor crop conditions by tagging images to specific plots, enabling precise interventions and yield tracking. In all these workflows the ability to capture images that immediately communicate where and when they were taken reduces back and forth, minimizes mistakes in file matching, and shortens reporting cycles. Project managers benefit from standardized overlay templates and naming conventions that enforce consistent documentation across teams. Ultimately GPS Map Camera photography is a practical bridge between visual observation and spatial data, turning ordinary photos into reliable building blocks for decisions, billing, and compliance. Stakeholders can assemble visual evidence bundles for audits, permitting, maintenance logs, or legal review purposes.
Beyond strictly practical uses, GPS Map Camera photography opens creative possibilities for travel, storytelling, and documentary work where place and time are part of the narrative. Travel photographers can create location oriented portfolios that allow viewers to follow a route visually and geographically, while photojournalists embed on the spot coordinates to strengthen reporting transparency. To make the most of overlays photographers balance legibility with aesthetics by choosing contrast, font size, and placement that do not obscure subject details. Consider placing captions in negative space or using semi transparent backgrounds to retain scene context. When composing shots think about scale and reference objects so that the embedded coordinates relate to visible landmarks rather than ambiguous scenes. In low light or high dynamic range scenarios keep overlays unobtrusive and rely on exposure techniques like bracketing to preserve detail, then apply the overlay during post processing if needed. For panoramic or stitched images pay attention to projection and coordinate consistency so the burned in label reflects the stitched viewpoint correctly. Creative projects also exploit metadata beyond the visible overlay: mapping a photo series to a timeline and route can produce immersive story maps or animated sequences that trace journeys, migrations, or project phases. Photographers experimenting with mixed media may combine geotagged photos with notes, audio recordings, and sketches attached to the exact location for richer field diaries. When working with teams establish overlay templates and naming schemes to keep visual language consistent across contributors, creating a cohesive archive that supports both artistic expression and practical retrieval. By treating embedded location data as a compositional element rather than an afterthought, creators expand the communicative power of photography and provide audiences with deeper orientation in place and time. Experiment with subtle graphic treatments, color coding, and layered captions to create visual languages for different series.
Using GPS Map Camera photography responsibly requires attention to privacy, consent, and data governance as well as technical accuracy. Before collecting identifiable images in private or sensitive locations field operators should be aware of local privacy norms and legal restrictions governing photography and data retention. When people are present obtain informed consent where required and redact personal information if images are used in reports or public presentations. Sensitive locations such as protected archaeological sites, secure critical infrastructure, and private residences may have additional restrictions on geotagging; consider whether visible coordinates are appropriate for publication or long term storage. From a data governance perspective implement retention schedules and access controls so geolocated photos are archived only as long as necessary and are accessible to authorized stakeholders. On the technical side prioritize accuracy by monitoring reported GPS precision and capturing multiple fixes if a single satellite solution looks unstable. Record the device time and time zone to avoid timestamp ambiguity, and if possible record supporting context such as nearby landmarks, survey markers, or a descriptive note that links the image to other records. When photographs serve as evidence keep an unmodified original with preserved EXIF metadata alongside any annotated or watermarked versions used for reporting, and record who captured the photo and under what conditions it was taken. Where chain of custody matters maintain logs of transfers, edits, and exports. Finally adopt common naming conventions and metadata schemas so images are searchable and interoperable across teams and systems. These measures help maintain trust in geotagged imagery while protecting privacy and maintaining the evidentiary integrity of visual records. Regular training and documented procedures promote consistent use among operators. Perform periodic audits of geotag accuracy and metadata completeness, and maintain off site backups or mirrored archives to prevent data loss. Review retention policies annually.
How to Get Started with GPS Map Camera?
- 1. Choose a GPS Map Camera app: Look for apps that integrate GPS functionality with camera features. Options include Geo Tracker, Mappt, or specialized GPS camera apps available for smartphones.
- 2. Set up your device: Install the chosen app on your smartphone or camera. Ensure GPS is enabled in your device settings.
- 3. Familiarize with app features: Explore features like location tagging, metadata options, and map integration. Understand how to access and use these features effectively.
- 4. Plan your shoot: Determine the location and subject you want to photograph. Consider using maps or satellite images to familiarize yourself with the area.
- 5. Capture images: Use the app to take photos. The app should automatically embed GPS coordinates in the image metadata.
- 6. Check settings: Ensure that the GPS coordinates are being recorded for each image. You may need to adjust settings for accuracy.
- 7. Review photos: After your shoot, review the images in the app. Explore how GPS data is presented alongside the photos.
- 8. Edit and share: Use editing tools within the app or external software to enhance photos. Share your work on social media or with those interested in GPS photography.
- 9. Explore advanced features: Look into additional capabilities offered by the app, such as geotagging, creating maps of your photo locations, or more elaborate location reports.
- 10. Keep practicing: Experiment with different locations, lighting conditions, and subjects to enhance your GPS Map Camera photography skills.
10 Pro Tips for GPS Map Camera Users
- 1. Enable GPS tagging to automatically geotag your images, providing precise location data for future reference.
- 2. Use high-resolution settings on your camera to ensure that captured images maintain quality when shared or printed.
- 3. Familiarize yourself with map layers to identify interesting geographical features or attractions before shooting.
- 4. Plan your shoot during the golden hour for optimal natural lighting, enhancing the overall quality of your photos.
- 5. Experiment with different angles and perspectives to create unique compositions that stand out.
- 6. Keep your camera's software and mapping applications updated for improved functionality and features.
- 7. Use the map feature to check for nearby points of interest, adding variety and context to your photography.
- 8. Consider using editing apps that support geotagged photography to create engaging photo stories based on location data.
- 9. Maintain a backup of your images on a cloud service to prevent loss and ensure access from anywhere.
- 10. Engage with photography communities online to share your geotagged images and gain feedback or tips from other enthusiasts.
The Best Hidden Features in GPS Map Camera
- Geotagging: Automatically adds location data to photos, allowing you to track where each picture was taken and organize them by location.
- Live Location Sharing: Share your real-time location with friends and family directly through the camera app, enhancing safety and group navigation.
- Map Overlay: Display a map overlay on your photos, providing a visual reference of the shooting location, useful for travel photography.
- Location-Based Editing: Some editing apps allow you to filter or enhance images based on their location, creating customized styles or themes.
- Trip Log Creation: Automatically create a travel log with date and location data for each photo, useful for documenting journeys.
- Route Mapping: Visualize and map the route you took while capturing photos, perfect for outdoor and adventure photography.
- Weather Data: Integrate weather information at the time a photo was taken, adding context to your images.
- Custom Location Tags: Create and save custom location tags for frequently visited places, making it easier to organize and recall images from those spots.