What is Motion Ninja Video Editor Apps?
Motion Ninja Video Editor integrates a versatile video player that serves as both a preview engine and a standalone playback tool within the editing workflow. The player supports smooth timeline scrubbing, frame by frame navigation, and adaptive playback speeds that range from slow motion to rapid forward review. It is designed to render effects and transitions in near real time during preview, reducing the need to render intermediate files before evaluating edits. Users can place markers and in and out points directly on the player controls to define trim ranges and loop segments for fine tuning. Audio playback is synchronized tightly with visual frames and allows users to mute or solo tracks, adjust volume envelopes, and quickly audition alternate sound beds while retaining precise alignment. The player window is resizable and can be detached or minimized to enable dual screen workflows or to focus on other panels. Subtitles and captions appear with accurate timing and offer styling options such as font selection, sizing, color, and edge treatments for clear visibility. Color preview options let you toggle between different scopes and LUT previews to see how grading adjustments influence playback. The player also offers a thumbnail scrubber and a visual waveform overlay to make locating specific moments faster. Hardware acceleration is utilized where possible to keep rendering and playback efficient, especially when handling high bitrate or high resolution source clips. Overall, Motion Ninja's video player is intended to streamline review cycles by bringing robust playback functionality directly into the creative process and minimizing interruptions between playing clips and refining edits. Additional features include customizable keyboard shortcuts for playback control, a predictive cache management system that prioritizes upcoming frames, A/B comparison playback for before and after states, and snapshot capture with embedded rendering metadata for easy reference for asynchronous team review needs.
From a user interface perspective Motion Ninja Video Editor places the video player at the center of the creative layout, prioritizing visibility and fast access to critical controls. The control set combines familiar transport elements - play, pause, stop, fast forward, rewind - with contextual tools like slip and roll controls for trimming and ripple edits for multi-clip adjustments. Gesture support on touch devices includes pinch to zoom the timeline, two finger scrub for precision, and tap-and-hold preview thumbnails that accelerate locating desired frames. Keyboard users benefit from customizable hotkeys, a responsive spacebar toggle, and arrow key nudges that move selection by frame increments. The player responds to project settings dynamically, adjusting preview resolution to balance detail and responsiveness so that even complex effect stacks remain viewable without hammering system resources. Overlay toggles give immediate access to timecode, frame rate indicators, and safe area guides, which are invaluable for broadcast and social media formatting. For accessibility the player supports screen reader text for key controls and provides high contrast UI themes and scalable interface elements to accommodate different visual needs. Users working with multiple timelines can lock the main playback to a single sequence while auditioning clips from other bins, preserving position and context. Integrated metadata viewing lets editors inspect codec, resolution, bitrate, and color space directly from the player, aiding troubleshooting and ensuring consistent playback expectations. A session history and undo stack make iterative review safer, letting creators backtrack playback-linked edits. Media organization features like subclip creation, tagging, and quick markers are tightly linked to the player so that discovery and playback operate as one continuous experience. Altogether the UI design seeks to reduce friction between watching and refining footage, enabling creators to remain focused on storytelling. Built-in interactive tips guide new users while advanced mode hides helpers to maximize editing area efficiently.
Performance and codec handling are core strengths of the Motion Ninja Video Editor video player, enabling robust playback across varied media types without interrupting creativity. The player accommodates a wide array of input formats and containers, applying optimized decoding pathways to maintain stable frame delivery. When working with high resolution footage or computationally expensive effects, the player can automatically engage proxy workflows that create lower resolution placeholders for smooth scrubbing while preserving links to full quality masters during final export. Multi core CPU threading and GPU acceleration are leveraged where appropriate, and there are options to adjust decoding threads, cache size, and playback resolution to match the capabilities of the host machine. Frame interpolation tools allow for judder reduction and synthetic slow motion while preserving audio pitch, and the player supports variable frame rate footage detection with conversion options to avoid audio drift. Real time composite rendering is supported, combining layered clips, chroma keyed elements, and motion tracked assets without committing to intermediate files. For challenging media such as raw camera formats or HDR sequences, the player exposes color management controls and preview gamut toggles so editors can verify look and luminance across different output intents. Time remapping curves and optical flow engines are available inside the player preview, enabling creators to sculpt dynamic speed changes and see the results instantly. Playback diagnostics offer visual overlays for dropped frames, buffer levels, and GPU usage, helping to pinpoint bottlenecks without stopping playback. Network streamed media playback and local file access are integrated, with robust buffering strategies for remote clips and adaptive quality adjustments to prevent stalls. Performance profiles let users save preferred settings for different projects, enabling instant switching between high quality and responsive preview modes.
The video player in Motion Ninja Video Editor is tightly integrated with the app's editing toolset so that playback informs creative decisions at every step. Keyframing controls are exposed directly inside the player, letting editors manipulate position, scale, rotation, opacity, and filter parameters while watching immediate results. Motion tracking runs live during playback previews, attaching masks, text, or graphics to moving subjects and updating tracked paths frame by frame so the user can refine tracking parameters without exporting. Compositing features like blend modes, alpha matte displays, and nested sequences render in the player so complex layered scenes can be assessed and iterated in place. A rich library of transitions and animated presets can be previewed and adjusted with timing handles on the player playhead, and procedural effects such as particle emitters, lens flares, and light leaks animate in sync with clip timing. The player supports plug in effects and third party filters, applying them in real time depending on available processing headroom, and it preserves adjustment layers and non destructive retiming so creative choices remain reversible. For audio driven effects, the player links waveform peaks to parameter modulation, enabling reactive visual effects that bounce or pulse to beats during playback. Color grading workflows benefit from split view comparisons, layerable LUT stacks, and live histogram overlays that update continuously so graders can judge balance and contrast. The ability to store snapshots and recall them into a version history lets artists experiment with multiple looks and immediately flip between them for comparison. Integration with batch processing and template engines means that edits crafted in the player can be applied consistently across sequences, enabling efficient iteration for series work or social content campaigns. Customizable rendering pipelines support conditional rules, so different clips can automatically receive distinct process chains during playback previews and tagging.
When it comes to finishing and delivery, the Motion Ninja Video Editor video player functions as a real time proofing stage that directly influences export decisions. Export presets can be evaluated through fast preview renders inside the player, letting editors validate bitrate, resolution, and keyframe intervals before queuing final jobs. The player supports soft proofing for multiple target platforms, showing simulated codecs and container behavior so creators can judge motion and compression artifacts prior to commitment. Batch export workflows integrate with the player's timeline markers and subclip selections, enabling sequences to be assembled into export queues with consistent naming, metadata embedding, and logical folder organization. For clients and collaborators who need quick references, the player can generate watermarked review copies and timecode stamped snippets that communicate specific feedback points without producing full size masters. Embedded export templates store variable fields for project name, scene number, and versioning, making repetitive deliverables faster and less error prone. The playback environment also interacts with color managed export pipelines, allowing users to preview output transforms, convert between color spaces, and check tone mapping for HDR to SDR conversions. When working on multi language projects the player supports subtitle embedding and sidecar file generation with customization of encoding, line length, and timing granularity. Comprehensive logging during playback captures frame statistics, render durations, and any dropped frames that may influence export strategies, and these logs can be exported alongside footage for traceability. For teams, timeline permissions and locked edit ranges preserve intent while allowing others to play back and annotate sequences; annotations are timestamped and stored with the project so feedback ties directly to specific frames. Together the player and export toolset create a cohesive finishing system that streamlines the path from preview to final deliverable. Smart presets and accelerated encoders speed delivery on large projects.
How to Get Started with Motion Ninja Video Editor?
- 1. **Download and Install**: Go to the App Store or Google Play Store and search for "Motion Ninja Video Editor." Download and install the app on your device.
- 2. **Create a New Project**: Open the app and tap on the “New Project” button. You may need to grant necessary permissions, such as access to your camera and media files.
- 3. **Import Media**: Select the video clips, images, or audio you want to use in your project. You can import files from your device’s gallery or other connected sources.
- 4. **Editing Basics**: Familiarize yourself with the interface. Tools like cut, trim, and merge are typically available for editing your clips. Tap on a clip in the timeline to access editing options.
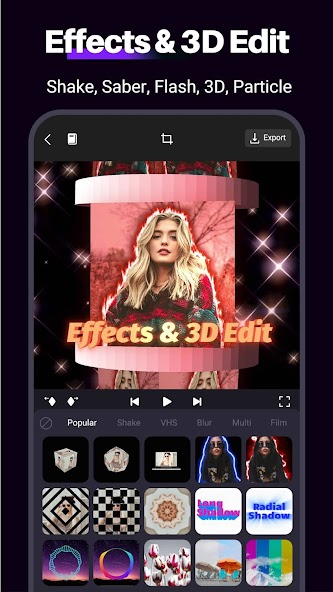
- 5. **Apply Effects**: Explore the effects and transitions library. You can add visual effects, filters, and transitions to enhance your video. Drag and drop effects onto clips in the timeline.
- 6. **Add Audio**: Insert background music, sound effects, or voiceovers. You can choose from built-in audio tracks or add your own by importing files.
- 7. **Text and Titles**: Use the text tool to add titles, subtitles, or captions. Customize the font, size, color, and position to fit your video’s style.
- 8. **Export Your Video**: Once you're satisfied with your edits, tap on the export button. Choose your desired resolution and format settings, then save the video to your device or share it on social media platforms.
- 9. **Tutorials and Practice**: Take advantage of online tutorials and guides specific to Motion Ninja for advanced techniques. Practice by creating different types of projects to improve your skills.
10 Pro Tips for Motion Ninja Video Editor Users
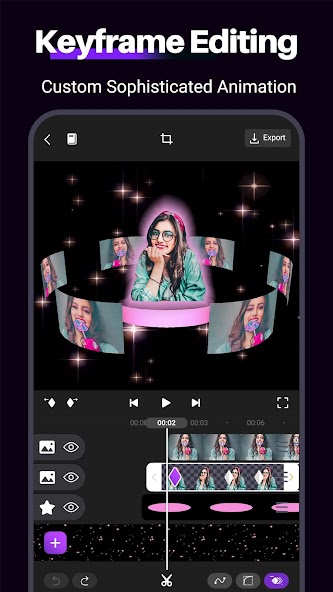
- 1. **Utilize Keyframes**: Master the use of keyframes to create smooth animations and transitions in your clips.
- 2. **Experiment with Motion Effects**: Explore the built-in motion effects and templates to enhance your videos and add dynamic elements.
- 3. **Layer Management**: Keep your project organized by using multiple layers for different elements, allowing for easier edits and adjustments.
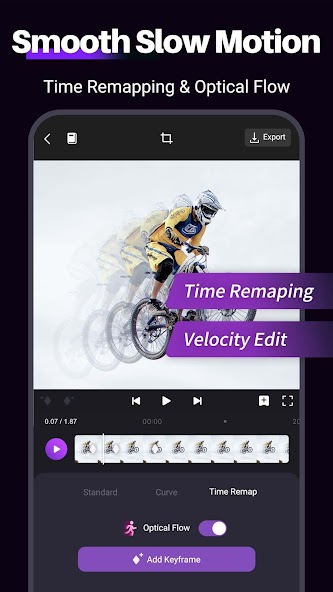
- 4. **Adjust Playback Speed**: Use the speed adjustment feature to create dramatic slow-motion or time-lapse effects, enhancing the storytelling aspect of your video.
- 5. **Color Grading**: Take advantage of color grading tools to establish a consistent look and mood throughout your video.
- 6. **Audio Syncing**: Ensure that your audio is perfectly synced with video clips for a more polished final product.
- 7. **Text and Titles**: Use the text feature to add engaging titles and captions to provide context or emphasize key points within your video.
- 8. **Preview Before Export**: Always preview your project before exporting to catch any mistakes or make last-minute adjustments.
- 9. **Utilize Transitions**: Incorporate creative transitions between clips to maintain viewer engagement and flow.
- 10. **Seek Tutorials**: Regularly look for online tutorials or community tips to learn new techniques and stay updated on features.
The Best Hidden Features in Motion Ninja Video Editor
- Keyframe Animation: Allows for precise control over motion and effects by adjusting properties frame by frame.
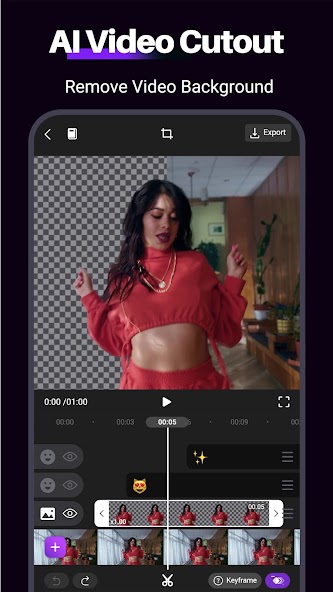
- Chroma Key: Enables users to easily remove backgrounds and replace them with custom images or videos.
- Speed Control: Offers the ability to adjust the playback speed of clips, creating slow-motion or time-lapse effects.
- Multi-Layer Editing: Supports multiple layers for advanced editing, allowing users to overlay videos, images, and effects seamlessly.
- Built-in Effects Library: Provides a wide range of built-in visual effects and transitions for enhancing video projects.
- Audio Synchronization: Allows for precise syncing of audio with video clips for a polished final product.
- Gesture Controls: Enables easy navigation and editing through touch gestures, enhancing the user experience.
- Export Options: Offers various export settings, including different resolutions and formats tailored for specific platforms or uses.
Motion Ninja Video Editor Faqs
How do I add music to my video in Motion Ninja?
To add music, open your project and select the 'Music' option from the toolbar. You can choose from the app's library or import your own music files.
Can I split a video clip in Motion Ninja?
Yes, you can split a video clip. Select the clip in the timeline, move the playhead to your desired split point, and look for the 'Split' tool to create two separate clips.
How can I adjust the speed of a video?
To adjust video speed, select your video clip in the timeline. Tap on the 'Speed' option, and you can choose to slow down or speed up the clip using a slider.
What’s the process to export a video in Motion Ninja?
To export your finished video, go to the 'Export' option typically found in the top right corner. Next, choose your export settings like resolution and frame rate, then tap 'Export' again to initiate the process.
How do I apply effects and filters to my video?
To apply effects and filters, open your project, select the video clip on the timeline, then navigate to the 'Effects' or 'Filters' tab. Browse through the available options, tap to apply the desired effect, and adjust settings as needed.