What is AI Video Editor - VivaCut Apps?
VivaCut as an AI video editor and videoplayer is a modern, feature-rich tool that blends traditional nonlinear editing with intelligent automation to accelerate creative workflows. At its core it provides a multi-layer timeline where clips, audio, visual effects, and titles coexist, enabling complex composite shots and precise timing control. Built-in AI modules streamline repetitive tasks: automatic scene detection divides long footage into logical clips, speech-to-text turns spoken words into editable subtitles and searchable captions, and smart trimming recommends cut points based on motion and audio events. Advanced masking and background removal let creators isolate subjects without expensive green screens, while AI-driven object tracking pins graphics, text, or effects to moving elements. The editor supports high-resolution formats, including 4K, variable frame rates, and common codecs, and it includes real-time preview with GPU acceleration for smoother scrubbing and playback. Creative toolsets mirror professional suites: keyframe animation for motion and parameter changes, layer blending modes for composite looks, chroma keying, speed ramping, and curves-based color correction with LUT support. Audio tools include multitrack mixing, adaptive noise reduction, automatic gain control, and simple mastering options, making it easier to balance dialogue, music, and effects. Templates and preset effects function as starting points for social clips, cinematic sequences, or branded content, and native export profiles cover a range of aspect ratios and bitrates. For creators who need rapid turnaround, batch processing and template-driven exports can produce multiple deliverables in one operation. The product aims to lower the barrier between concept and finished video by combining manual precision with AI accelerators, making it practical for hobbyists, social media creators, and small production teams to create polished content without a steep learning curve.
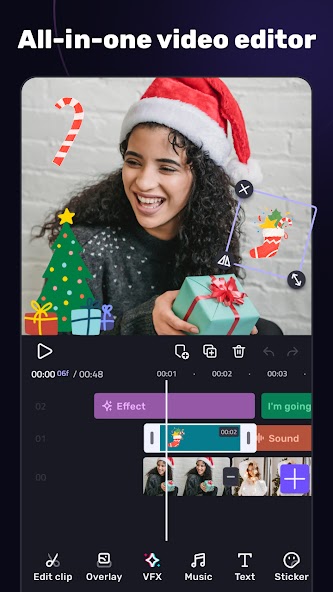
User experience within this editor emphasizes direct manipulation and visual clarity. The interface typically centers on a timeline with draggable layers, a source panel for raw assets, and a preview window for frame-accurate playback. Playback performance benefits from hardware-accelerated decoding and proxy workflows, where lower-resolution proxies are generated for smooth editing while full-resolution media is retained for final export. Import supports a variety of media types and frame sizes, and the editor automatically organizes assets into bins or folders so users can find clips, audio tracks, and graphics quickly. Contextual toolbars change depending on the selected element, offering relevant controls for trimming, keyframing, color correction, or audio gating. Keyboard shortcuts and gesture support speed up frequent operations, while a modular panel layout lets users tailor the workspace to their preferences. Timeline features include ripple and roll edits, slip and slide tools, edge trimming, and fine-grain nudging for precise alignment. Layer compositing includes opacity and transform controls, mask feathering, and motion blur options for natural-looking movement. Rendering and preview settings allow users to prioritize quality or speed, with render caching for sections that require repeated playback. For teams working remotely, project export and import make it possible to move sequences between machines and continue editing. Regular autosave and versioning reduce the risk of losing work during complex sessions. Overall, the product balances approachable tools for beginners with deep controls that experienced editors can rely on to produce nuanced, high-quality videos.
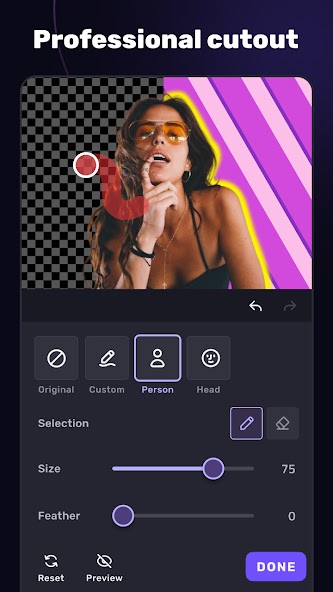
The AI capabilities are positioned as productivity multipliers that reduce manual labor while offering creative options that would be time consuming to build manually. Scene detection and intelligent clip suggestion analyze visual and audio cues to propose edit points, which accelerates assembly of rough cuts. Automated caption generation uses speech recognition to produce subtitles that are editable and timestamped, and text styling can be applied globally to maintain brand consistency. Background subtraction and subject segmentation let users replace or stylize backgrounds without manual rotoscoping; these tools are particularly useful for interviews, product videos, or short films where setting control is limited. Style transfer and AI-driven color grading can apply a consistent cinematic look across disparate shots, and adaptive color matching helps shots from different cameras appear cohesive. Motion tracking powered by AI allows effects and text to follow subjects while compensating for quick movements and occlusions. There are also creative AI features like automated remixing of footage to beat-driven templates, which adapts clip cuts to music tempo. Limitations are typical of current-generation AI: subject segmentation may struggle with fine hair detail or highly complex backgrounds, and speech-to-text accuracy varies with audio clarity and accents. However, these features are designed to be editable rather than final, giving users control to refine AI suggestions. For many workflows, the AI dramatically shortens early stages of editing and gives more time for intentional creative choices and fine polishing.
From a professional workflow perspective, the editor supports integrations and formats that help it sit alongside other production tools. Project interchange formats such as EDL, XML, or timeline export options facilitate handoffs to more specialized color grading or audio finishing applications. Support for LUTs, third-party plug-ins, and custom effect stacks makes it possible to establish a consistent look and pipeline for recurring projects. Proxy editing and media management tools accommodate large resolutions and long-form projects by allowing editors to work responsively on modest hardware and then relink to originals for final renders. Multicamera editing features enable synchronized playback and angle switching for event coverage or interviews, and markers or comments can be used to annotate key moments for collaborative review. Export presets can be configured for different delivery targets with customizable bitrates, codecs, and container formats, and batch export functionality streamlines delivery of multiple versions for different platforms or client needs. For teams, project templates and shared presets help maintain brand standards, while version history keeps track of iterative changes. Metadata tagging of clips, color labels, and smart bins accelerate search and organization in large libraries. The suite of professional features bridges quick content creation with a robust, repeatable pipeline suitable for freelancers, agencies, and small studios aiming to deliver consistent, broadcast-quality work without an overly complex infrastructure.
Creative use cases range from social media storytelling and short-form ads to educational content and indie filmmaking. For short attention-span formats, the editor’s aspect ratio controls, beat-aware cutting, and motion templates help creators produce punchy content that retains viewer engagement. Educators can use subtitle generation, chapter markers, and clean audio tools to make lesson videos more accessible and easier to navigate. Marketers benefit from brand template systems, on-brand title sequences, and quick color treatments that keep campaign assets consistent across multiple videos. Independent filmmakers can rely on keyframe animation, compositing, and color tools for narrative work, while the editor’s layering and masking capabilities enable in-camera style visual effects without elaborate rigs. Practical tips for getting the most from the tool include planning shot lists to maximize cut options, recording clean audio to improve speech recognition, and using consistent lighting to simplify automatic background work. Employing proxies or transcodes helps when working with high-resolution footage, and organizing media with clear naming conventions and metadata saves time during assembly. For visually driven projects, combining AI-assisted scene suggestions with deliberate manual refinement yields efficient yet artistically controlled results. The combination of intelligent automation, hands-on creative controls, and delivery options positions this editor as a flexible choice for anyone looking to move faster from concept to polished video while retaining creative control and technical quality.
How to Get Started with AI Video Editor - VivaCut?
- 1. Download and Install:
- - Go to your device’s app store.
- - Search for "VivaCut" and install the app.
- 2. Create a New Project:
- - Open VivaCut.
- - Tap on "Create New Project."
- - Choose the aspect ratio suitable for your video.
- 3. Import Clips:
- - Select video clips from your gallery.
- - Tap on the clips to import them into the timeline.
- 4. Edit Your Video:
- - Trim and split clips using the timeline.
- - Add transitions between clips for smoother flow.
- - Use filters and effects to enhance video quality.
- 5. Add Music and Sound:
- - Access the audio section to add background music.
- - Choose from VivaCut’s library or import your own tracks.
- 6. Text and Titles:
- - Use the text tool to add titles, subtitles, and captions.
- - Customize the font, size, and color to match your theme.
- 7. Export Your Video:
- - Once editing is complete, tap on the export option.
- - Choose the resolution and format for your final video.
- - Save it to your device or share it directly on social media.
- 8. Explore Advanced Features:
- - Experiment with keyframe animation for more dynamic editing.
- - Use the picture-in-picture function for overlays.
- 9. Tutorials and Community:
- - Check out VivaCut’s official tutorials for tips and tricks.
- - Join online forums or communities for additional support and inspiration.
10 Pro Tips for AI Video Editor - VivaCut Users
- 1. Utilize the timeline to arrange clips efficiently for smooth transitions.
- 2. Use keyframe animations to add dynamic effects and motion to your videos.
- 3. Experiment with color grading tools to enhance the visual appeal of your footage.
- 4. Incorporate royalty-free music tracks to create an engaging audio backdrop.
- 5. Apply text overlays and titles to convey messages clearly and creatively.
- 6. Take advantage of filters and effects to give your videos a unique style.
- 7. Use slow-motion and speed ramping features to emphasize key moments.
- 8. Regularly preview edits to ensure a cohesive flow throughout the video.
- 9. Stay organized by labeling and grouping your media files.
- 10. Explore tutorials and community forums for tips and inspiration to improve your editing skills.
The Best Hidden Features in AI Video Editor - VivaCut
- Multi-layer timeline for advanced editing.
- Split-screen feature for side-by-side video.
- Color grading tools to enhance video aesthetics.
- Keyframe animation for dynamic effects.
- Voiceover recording within the app.
- Built-in music and sound effects library.
- Easy text and caption customization.
- Motion tracking for visual effects.
- Templates for quick edits.
- Picture-in-picture support for layered visuals.
AI Video Editor - VivaCut Faqs
How can I create a new video project in VivaCut?
To create a new video project, open VivaCut, tap on 'New Project', select the video clips you want to include, and then tap 'Next'. You'll be taken to the editing interface where you can start editing your video.
What editing tools are available in the app?
VivaCut offers a variety of editing tools including video cutting, merging, text overlays, transitions, effects, and audio editing. You can use these tools to customize your video according to your preferences.
How can I add music to my video?
To add music, navigate to the 'Audio' section in the editing interface. From there, you can choose to add music from the app’s library or import your own audio files to sync with your video.
How do I export my edited video?
To export your video, tap on the export button located at the top right corner. Choose your preferred resolution and frame rate, then tap 'Export'. The video will be processed and saved to your device.
How can I utilize advanced features like layers and keyframe animation?
To use advanced features like layers and keyframe animation, follow these steps:
1. Start a new project and add your video clips.
2. Select the clip you want to animate.
3. Tap on the 'Animation' option and choose 'Keyframe'.
4. Adjust the properties at different points in the timeline to create your desired animation effect. This allows for more dynamic video edits.