How to Get Started with Alight Motion?
- 1. **Download and Install**: Get the Alight Motion app from the Google Play Store or Apple App Store.
- 2. **Create a New Project**: Open the app and tap on the "+" icon to start a new project. Set the desired aspect ratio for your video.
- 3. **Import Media**: Tap on the “+” icon to import video clips, images, or audio files from your device or cloud storage.
- 4. **Edit Clips**: Use the timeline to trim, split, or rearrange your clips. Adjust the duration by dragging the edges of the clips.
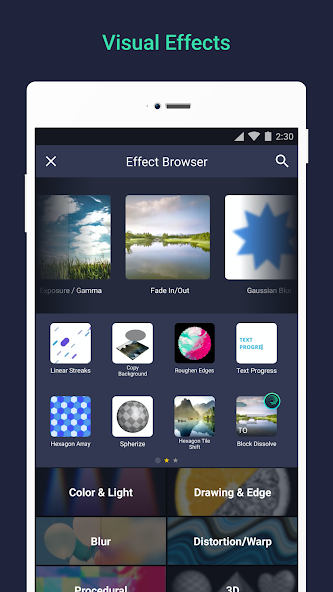
- 5. **Add Effects and Transitions**: Explore the effects library to add visual effects or transitions between clips. Tap on a clip and select "Effects" to apply.
- 6. **Text and Graphics**: Use the text tool to add titles or captions. You can also import graphics or create vector graphics within the app.
- 7. **Layer Management**: Organize your media in layers for better control. You can adjust the visibility and order of the layers as needed.
- 8. **Adjust Audio**: Import background music or voiceovers. Adjust volume levels and apply audio effects if needed.
- 9. **Preview Your Video**: Tap the play button to preview your project and make adjustments as necessary.
- 10. **Export Your Video**: Once satisfied, tap the export button. Choose your desired resolution and frame rate, then save to your device or share directly to social media platforms.
- 11. **Seek Tutorials**: For more complex features, search for online tutorials or guides specific to Alight Motion for additional tips and techniques.
10 Pro Tips for Alight Motion Users
- 1. **Layer Management**: Organize your layers efficiently. Use color codes for different types of media (audio, video, graphics) to easily identify and manage them.
- 2. **Use Velocity Graphs**: Take advantage of the velocity graph feature for smoother and more dynamic motion in your animations, allowing for precise control over speed and easing.
- 3. **Experiment with Effects**: Explore the wide array of effects available in Alight Motion. Combine multiple effects creatively to achieve unique looks for your projects.
- 4. **Export Settings**: When exporting your videos, use the highest bitrate for better quality. Adjust resolution according to your intended platform (e.g., 1080p for YouTube or 720p for mobile).
- 5. **Snap and Align**: Utilize the snap and align tools to precisely position your layers and maintain a clean layout, making your project look more professional.
- 6. **Keyframe Animation**: Make the most of keyframing to create intricate animations. Adjust the timing and transitions between keyframes for more fluid results.
- 7. **Custom Fonts and Text**: Import custom fonts to enhance your text elements. Make sure they complement your project’s style for a cohesive look.
- 8. **Audio Synchronization**: Sync your visuals to the beat of the audio track. Use the waveform display to help with timing and placement of cuts or effects.
- 9. **Backup Projects**: Regularly backup your projects in the cloud or export them as a draft. This prevents data loss and allows you to revisit older edits easily.
- 10. **Tutorials and Community**: Engage with the Alight Motion community. Tutorials and user-generated content can provide inspiration and techniques to elevate your editing skills.
The Best Hidden Features in Alight Motion
- 1. **Keyframe Animation**: Create smooth animations by using keyframes to adjust properties like position, scale, rotation, and opacity over time.
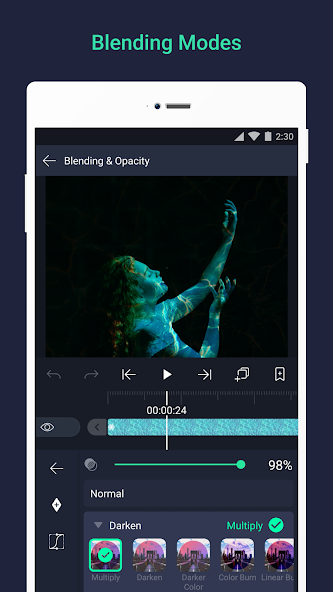
- 2. **Blend Modes**: Utilize different blend modes to combine layers creatively, allowing for unique visual effects and improved layering.
- 3. **Masking and Clipping**: Use masking tools to create custom shapes and reveal effects or videos, enhancing the storytelling aspect of your projects.
- 4. **Speed Control**: Adjust the speed of your clips, including speed ramps for dramatic effects, to enhance the visual narrative.
- 5. **Audio Syncing**: Tap into audio visualization features that help sync your animations with audio tracks for a professional feel.
- 6. **Graphic Elements and Effects**: Access a library of built-in graphic elements, effects, and overlays to enhance your videos with minimal effort.
- 7. **Color Adjustment Tools**: Fine-tune your video clips with detailed color correction tools to enhance the overall aesthetic of your project.
- 8. **Group Layers**: Organize multiple layers into groups for easier manipulation and editing, streamlining your workflow during complex projects.
- 9. **Export Settings**: Choose from various export settings for quality and file size, ensuring your final product meets the necessary specifications for different platforms.
- 10. **Custom Presets**: Save your frequently used settings and effects as presets for quick application in future projects.


1.Rate
2.Comment
3.Name
4.Email